Import Items Using a CSV File
Using new software and setting up a database correctly can be a worry for any company, but Boxstorm’s easy-to-use interface and simple directions can make this a smooth process. This article has been created to provide you with the most beneficial information when it comes to getting started. Information may be added manually to your database at any time; however, depending on the amount of data that needs to be entered, it may be more beneficial to import information in batches.
There is a certain order that information should be imported into your database for the most success. We suggest viewing the Getting Started page for this recommended order that items should be entered into your database.
Importing Items
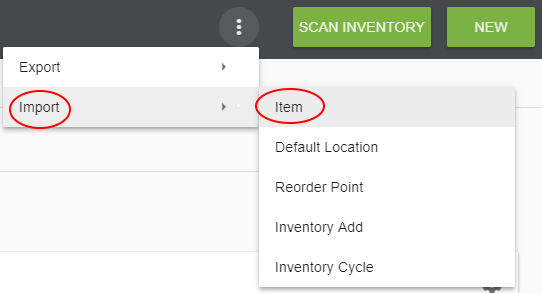
1. To import items, first go to the Items module located on the left sidebar. Click the![]() option to create a dropdown menu where all of the import/export options will be shown. Select Item: Import.
option to create a dropdown menu where all of the import/export options will be shown. Select Item: Import.

2. All Imports provide you with the option to download a sample CSV file. This will help you to see how a file should be formatted so that it can correctly import. You can use this file as a template and delete the information shown for the sample database (recommended), or you can create your own file and add each of the headers needed yourself.
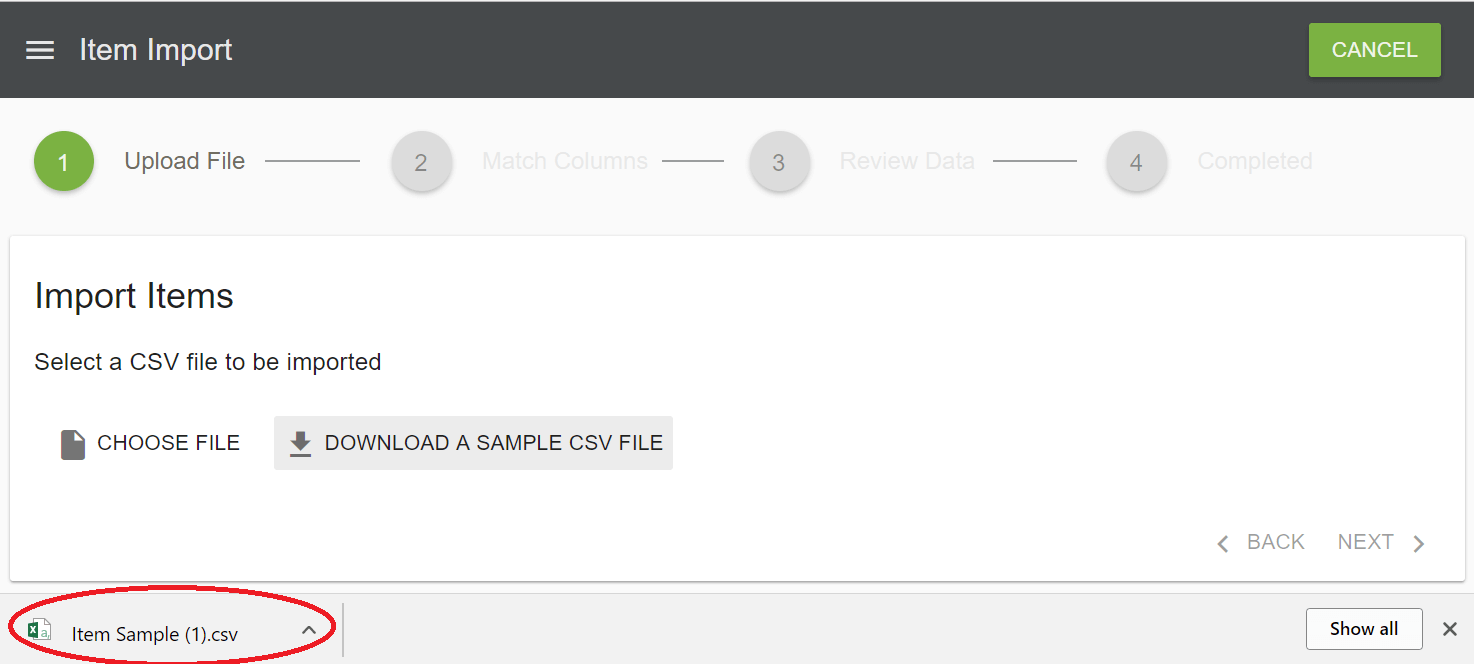
3. Once the sample CSV file has been downloaded, you can open it by clicking the file located in the lower left hand corner of the screen. (It may also be located in your Downloads folder.)
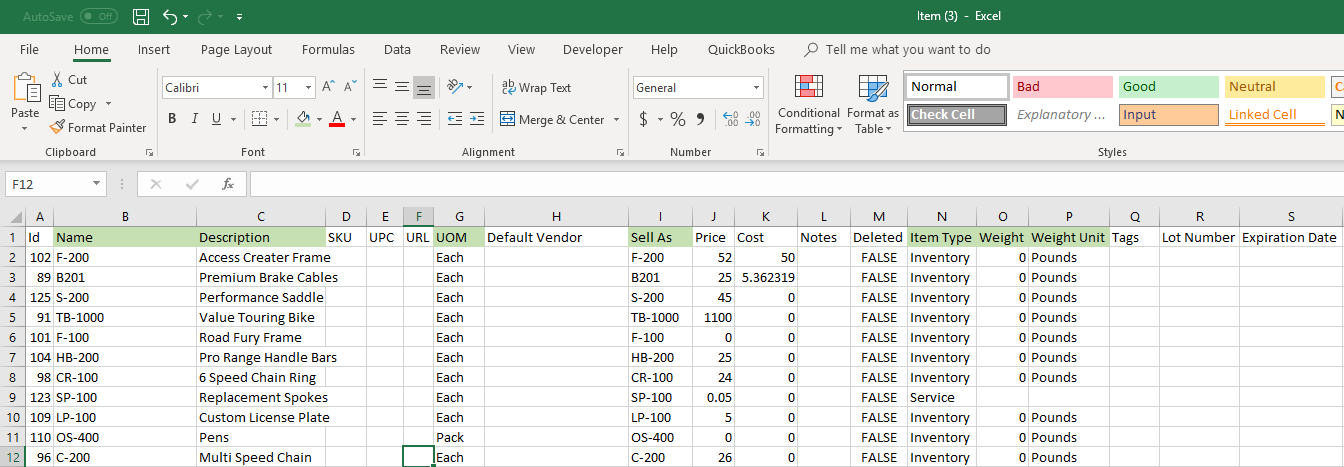
4. The spreadsheet shown on the left is the correct format for importing items. All of these columns do NOT need to be filled in order to import items. The columns highlighted in green are the ONLY REQUIRED COLUMNS for a successful import.
The green columns shown above are REQUIRED for the import to be successful. We recommend deleting the sample data from this file and using it to enter your own data. Or you also have the option of creating a new spreadsheet (CSV file format) and simply copying the headers to your new file.
The information below provides the description of each field. Remember, only the GREEN HIGHLIGHTED fields are required to be populated. Every other field is optional.
Weight: (Required) This is for use with the Shippo integration. If you do not want to use the Weight feature in Boxstorm, you must still place a 0 in the field or it will fail when importing. If it is a shipping- or service-type item, you do not need to enter a weight.
Weight Unit: (Required) This is also for use with the shipping features in Boxstorm. If you do not want to use the Weight feature, you must still place pounds, kilograms, or some other unit of weight measurement for inventory-type parts.
Default Vendors: (Optional) This is the preferred vendor that you order each item from and is useful if you plan to set up reorder points (ROP). If you have a min & max level set for an item (levels are set up in the Items module), you can click “AutoPO” in the Purchase Orders module and create a Purchase Order for its default vendor. If you don’t have a default vendor, keep the header on the spreadsheet but leave the column blank.
UPC: (Optional) This is the field a barcode is scanned into. If you are using barcodes that are already associated with items, they may be scanned here. You do not have to use this system to barcode. If an item does not already have a barcode, then Boxstorm can print a barcode for the item immediately following the import. If you do not have a UPC, keep the header on the spreadsheet but leave the column blank.
Sell As: (Required) This is the name of the item as it appears on a Sales Order. Depending on your company process, this may just be the same as the item’s “name.” If you want to sell an item with a different name than that which is used internally, then enter the Sell As name here. If you wish to keep the item’s name the same on the Sales Order as it is internally, then simple copy and paste the Name column to this column.
Tag: (Optional) This is a way to categorize items. For example, if I have a red adult road bike, I could set tags such as “road bike, asset, red, adult.” Tags can be filtered on some reports (such as Inventory on Hand), and can be used to view stock or email a PDF stock report to clients. There is no limit on tags, and they need to be separated by a comma.
UOM: (Required) This is the Unit of Measure and details how you measure or sell your item. Each is the default UOM in every Boxstorm database, but others may be added. If you plan to have Units of Measure that are different than each (ea), they need to be manually added (or imported via CSV file) BEFORE importing the items.
Description: (Required) This is the description of your item. Descriptions can be searched, so it is recommended to have detailed identifiers. For example, “Youth green helmet” could be searched by youth, green, or helmet.
Item Type: (Required) This is the item type and has 3 options. You may choose from Inventory, Shipping, or Service. Inventory items are the most common.
URL: (Optional) This is to link a file on a computer page or a website for internal reference. If you do not have a URL, keep the header on the spreadsheet but leave the column blank.
SKU: (Optional) This is a field that may be useful if you have a second name for an item. Items can also be searched by SKU. If you do not have a SKU, keep the header on the spreadsheet, but leave the column blank.
Deleted: (Optional) This field is not used during an initial import, and is beneficial when your desire is to delete items in bulk. Items can only be deleted after they have been already entered into the system. To delete, mark the field as “true.” If this is an initial import, simply leave the column here blank.
Price: (Required) This is the price you will be selling the item for. If you do not know the price at this time, you can enter 0.00 for this column and re-import the price at a later date.
Cost: (Optional) This is the cost from your vendor to you. This will not enter a cost for an item that does NOT have any inventory. Rather, it creates a cost based on the history usage for this item. Inventory is not added during this import, but may be added on a separate import if desired.
Notes: (Optional) This is an internal only note that can be added to an item. You can search this in the Notes field.
Name: (Required) This is the item’s number or name.
ID: Do not fill this in. Boxstorm assigns an ID upon importing your items into the database. This will always be left blank when importing new items.
5. After the spreadsheet has been populated correctly, go back to the Items module and once again choose the 3 vertical circles in the upper right hand corner. Select Item: Import.
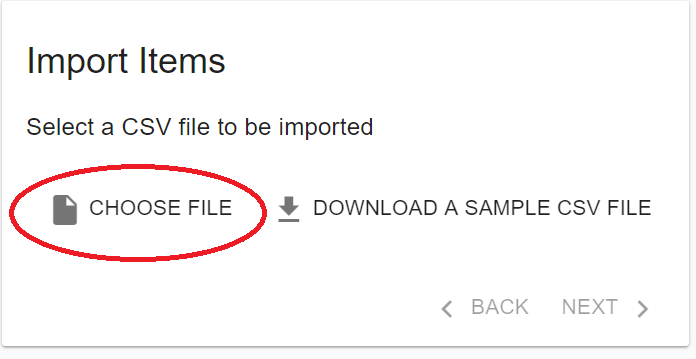
6. This time, select the Choose File option and browse to where your CSV file is located.
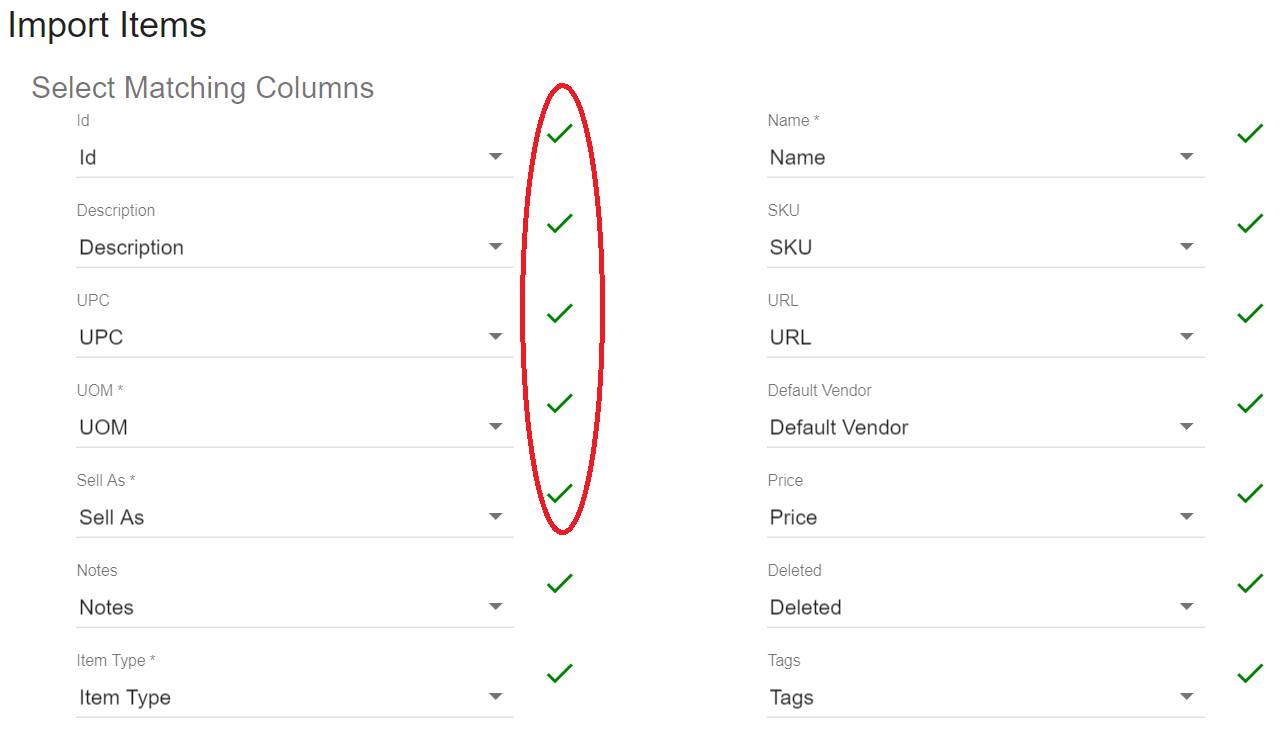
7. Once the file is uploaded, your screen will show a summary report like the image on the left. If the file has been filled accurately and has all of the necessary information in the correct places, you will see green checkmarks next to the columns. If there is data that needs a little more specification, there will be a red X and a notice asking you to choose the correct column for the info. For example, if the system cannot tell which column on your spreadsheet is supposed to be the description, it will ask you to select the column manually using the dropdown. If you continue to have problems with the upload after this point, please contact support@boxstorm.com and attach your spreadsheet, as well as a screenshot image and detailed description of the problem.
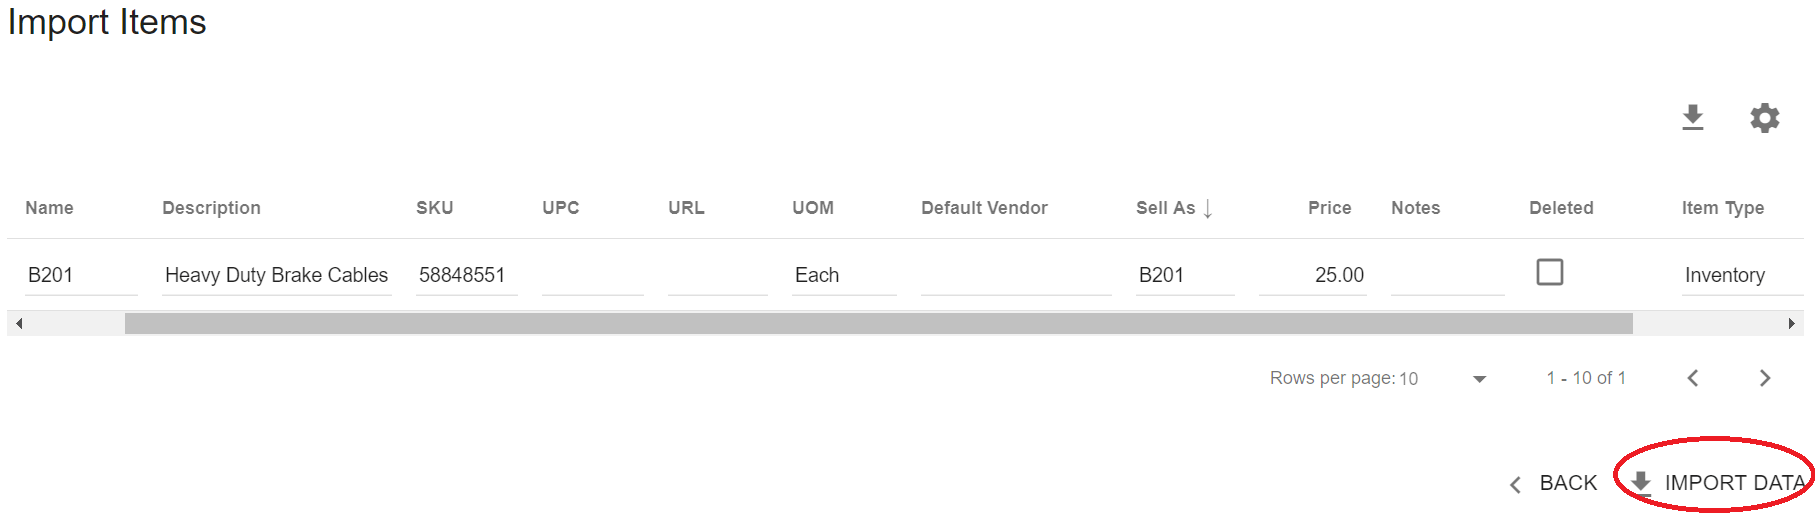
8. Once each item is approved with green checkmarks, click the Next button. You will now see a Summary page like the one on the left. All of your items to be imported will be shown in a list. Here you can click on any field to finalize the import and make any last-minute changes. Once you are satisfied with your import, choose the Import Data option in the lower right hand corner.
Congratulations! You have now imported your items into your database. If you have any difficulty after reading this documentation, please email support@boxstorm.com. It will be helpful if you include the spreadsheet and/or details on what you need help with when you contact us.